


If you’re looking to install Windows 11 on your PC, creating a bootable pendrive is the most efficient way to do it. A bootable USB drive allows you to install or repair Windows 11 on any compatible system without needing a DVD. In this guide, we will walk you through how to create a bootable pendrive using different methods, ensuring you can easily set up Windows 11 on your PC.
Windows 11 has specific system requirements, and having a bootable pendrive makes the installation process smoother. Whether you’re upgrading an existing PC or performing a fresh installation, this guide will help you make the process easier.
Why Do You Need a Bootable Pendrive for Windows 11?

Before jumping into the process, let’s understand why you might need a bootable USB drive:
- Fresh Installation: If your PC has no operating system or needs a fresh start.
- System Repair: A bootable pendrive helps fix corrupted system files.
- Portability: To easily install Windows 11 on multiple devices.
- Bypassing Network Installations: A bootable USB eliminates dependency on internet speed.
You can also buy and sell old laptops on OLX
System Requirements for Windows 11 Installation
Before creating a bootable USB, ensure your PC meets Windows 11 requirements. These may include-
- Processor: 1GHz or faster with at least 2 cores (64-bit processor)
- RAM: Minimum 4GB
- Storage: At least 64GB
- Secure Boot & TPM 2.0 enabled
- Graphics Card: DirectX 12 compatible with WDDM 2.0 driver
Tips for a Smooth Installation

- Back up your data: Before installing Windows 11, create a complete backup of your important files. An external hard drive with automatic backup software provides the most reliable protection.
- Update drivers: After installation, check for and install any available driver updates for your hardware.
- Activate Windows: If you didn’t enter a product key during installation, you’ll need to activate Windows 11 after the installation is complete.
- Check for updates: Once installed, use Windows Update to check for and install any available updates for your system.
Methods to Create a Bootable Pendrive for Windows 11
Here are the most reliable methods on how to create a bootable pendrive for Windows 11:
Method 1: Using Microsoft’s Media Creation Tool
Microsoft provides an official tool to create a bootable USB for Windows 11. Follow these steps:
Step 1: Download the Media Creation Tool
- Visit the official Microsoft website.
- Click on Download Now under the Create Windows 11 Installation Media section.
Step 2: Run the Media Creation Tool
- Open the downloaded file and accept the terms.
- Select Create Installation Media and click Next.
Step 3: Select Language, Edition, and Architecture
- Choose your preferred settings and click Next.
Step 4: Choose USB Flash Drive
- Insert a pendrive with at least 8GB storage.
- Select the USB drive and click Next.
Step 5: Create Bootable USB
- The tool will download Windows 11 files and create a bootable USB.
- Once done, click Finish and eject the USB safely.
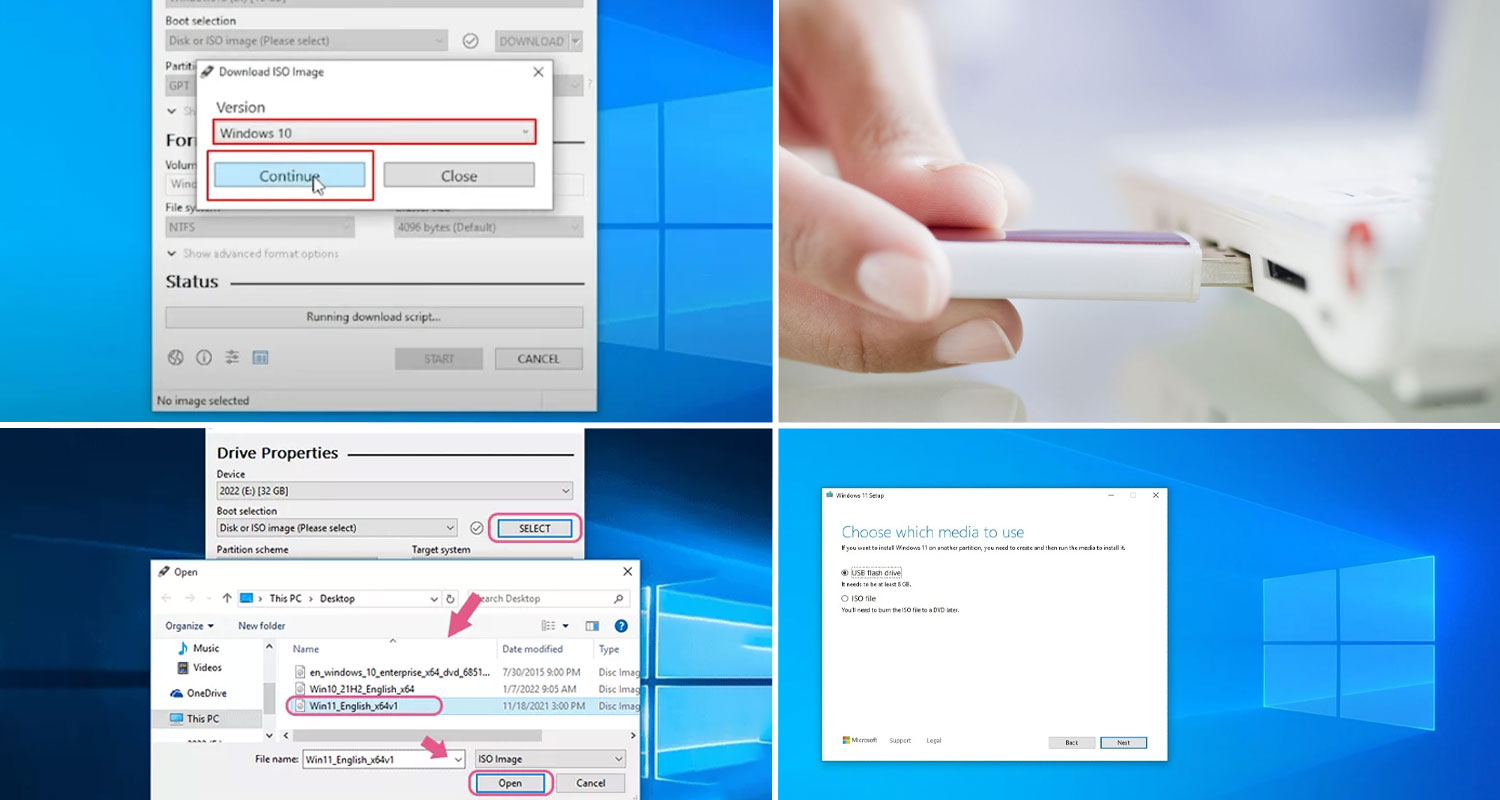
Method 2: Using Rufus
If you prefer a third-party tool, Rufus is an excellent alternative. Here’s how to create a bootable pendrive using Rufus:-
Step 1: Download Rufus
- Visit rufus.ie and download the latest version.
Step 2: Insert USB Drive and Open Rufus
- Plug in your USB drive and launch Rufus.
- It will detect the drive automatically.
Step 3: Select Windows 11 ISO File
- Click on SELECT and choose the Windows 11 ISO file.
Step 4: Configure Boot Options
- Set Partition scheme to GPT.
- Set File System to NTFS.
Step 5: Start the Process
- Click START and wait for the process to complete.
Comparison of Different Methods
| Feature | Media Creation Tool | Rufus |
| Official Microsoft Support | Yes | No |
| Requires Windows 11 ISO File | No | Yes |
| Advanced Customization | Limited | High |
| Works on Older PCs | Yes | Yes |
Common Issues and Troubleshooting

Here are some common challenges you may experience when creating a bootable pendrive and how to resolve them efficiently:-
1. USB Not Recognized
- Ensure the USB is properly inserted.
- Try changing the USB port.
2. Windows Installation Stuck
- Disable Secure Boot in BIOS settings.
- Recreate the bootable USB using a different method.
3. Insufficient Storage Space
- Use a USB drive with at least 16GB of free space.
Conclusion
Creating a bootable USB drive for Windows 11 is a straightforward process that can save you time and hassle during installation. By following the steps outlined in this guide, you can ensure a smooth setup of Windows 11 on your PC, whether it’s for a fresh installation or system repair. With your bootable pendrive ready, you’re all set to take your Windows experience to the next level
Looking for affordable USB drives? At OLX, you can find high-quality pendrive for creating a bootable drive at the best price! Explore the website or app for the best deals on storage devices and laptops today!
Frequently Asked Questions
What is the easiest way to create a bootable pendrive for Windows 11?
The easiest way to create a bootable pendrive for Windows 11 is by using the Microsoft Media Creation Tool, which automates the entire process.
Can I use an 8GB USB drive for Windows 11 installation?
Yes, an 8GB USB drive is the minimum requirement, but a 16GB drive is recommended to avoid storage issues.
Do I need an internet connection to create a bootable pendrive?
Yes, if you use the Microsoft Media Creation Tool. However, with Rufus, you can use a pre-downloaded Windows 11 ISO file.
What should I do if my computer does not boot from the USB drive?
Check your BIOS settings and set the USB drive as the first boot option.
Can I install Windows 11 on multiple PCs using one bootable USB?
Yes, a single bootable USB can be used to install Windows 11 on multiple devices.
Also Read:
| Your Guide to Buying Second-Hand Laptops |
| Step-by-Step Guide: How to Secure Your Laptop from Virus Attacks |


